If you are a creative and curious person that thinks twice before buying expensive things for yourself or home then you are in the right place.I post new articles every week trying to teach or inspire you to create beautiful things.Do it Yourself! It's more fun that way!
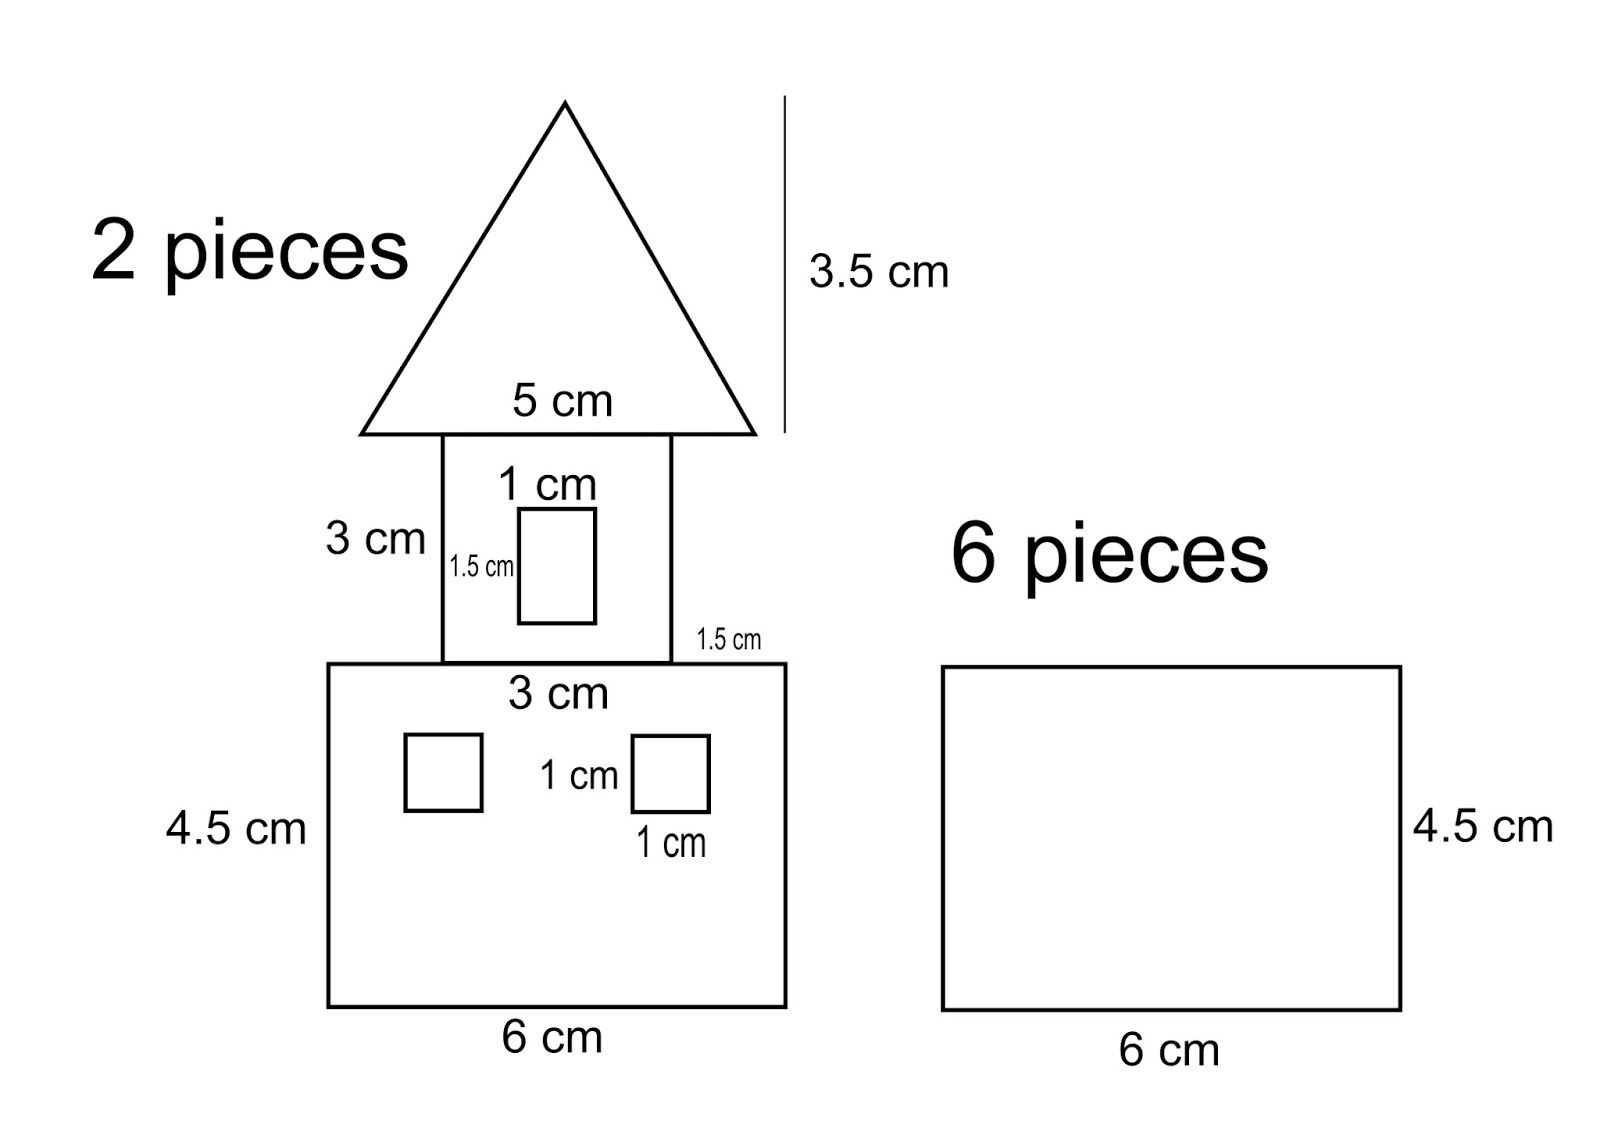
IMPORTANT NOTE: if you want the scaling to be precise, print this on a A5 size paper (148 × 210 millimeters or 5.83 ×8.27 inches.) or on a A4 size paper split in two like I did in the video. All the instruction are in the video bellow:
November is here! yay! it's that time when the leaves form a beautiful and colorful carpet,making your walks through the park seem like a fairy tail. Also it's a good boost for inspiration, to keep those DIY coming. So here's an idea : a printed scarf. It's perfect to keep you protected in those chilly mornings and also it's a great way to spice up your outfit.
Materials:
-fabric paint
-a big sheet of fabric (I bough a bed sheet from the thrift store)
-some printed designs. If you want to use mine you can download them for free:
Hey everyone! Thanksgiving is coming soon and I don't know about you, but every time I have to visit family or friends for the holidays I don't know what gift to bring. So here are 5 ideas to help you with that. If you don't celebrate Thanksgiving that's ok because these gifts can be used as they are or as inspiration for other events like Christmas or birthdays or even as favors for a fall wedding.
I hope you enjoy it and find it useful.
In this tutorial I'm using for labels a pumpkin image that I designed myself:
Halloween is approaching fast so I thought of showing you guys an easy and cheap way to create scary unique lanterns, that you can use to decorate your living room or your house entrance to scare off the unwanted visitors.Muhaha!
For this you will need just some jars, a glue gun and some acrylic paint. Don't use spray paint because it's toxic and flammable!
The secret ingredient for this is the scary face pattern that I've created for you specially so you can download for free and use in your projects.
But of course that you can draw your own scary faces, and you will be saving some time and paper.
Print this in a size that once you cut out a face, it will fit your jar. If you are using 500 ml jars I recommend printing this on A4 paper. I've used some small kitchen jars from the dollar store so I printed this 4x6 inches on A4 sliced in 2.
I just love this new home decor trend, that suggest luxury - through its colors(mostly gold ) , but also simplicity- through geometry. Because most of the items out there are pretty expensive I challenged myself to create something similar using cheap materials , or why not, through recycling .So here is my idea: a bee hive vase made out of a plastic bottle!
Materials:
1.Plastic bottle (try to find one with a smooth surface)
2. Bee hive pattern- >
3. Glue gun - (for this project I consumed 3 glue sticks)
4. Golden spray paint - if this seems too much to buy -don't worry- you will definitely use it on future project (I already used it 5 times ! and I have enough left)
I always found no numbers clock very cool. We should stop being so addicted to time, and stop checking it so often. (Well expect when you have an important meeting to attend to ).
I also love retro/ vintage clock designs. You can still find them at vintage shops if you're lucky, and sometimes they can get expensive. Here is a fun way to create your own, using a Pringels can! (next time you enjoy a can of chips , don't throw that away )
I finished school some time ago, but I remember that every year
before it would start, I really enjoyed going shopping and getting
prepared and I used to personalize my school supplies to get more
excited about it.
I invested a lot of time in finding the perfect
ideas, and creating this tutorial, and because I thought so much about
it, I made 2 videos !here is part 2 of the series. You can see Part 1 here
I finished school some time ago, but I remember that every year before it would start, I really enjoyed going shopping and getting prepared and I used to personalize my school supplies to get more excited about it.
I invested a lot of time in finding the perfect ideas, and creating this tutorial, and because I thought so much about it, I will even make a part 2 ! that will be out on my Youtube channel next week. So stay tuned!
Before we begin here is something to pin:
Idea number 1 : Pencil Toppers
Supplies:
-pom-poms (big and small)
-pencils
-felt (black and white)
-glue (gel type)
-scissors
-double sided tape and some printed paper or washi tape (optional for decoration)
Steps:
1.Stick together big and small pom poms to recreate bunny or bear shapes
2. Cut out eyes and noses from the felt and stick them on the faces
3.Remove the eraser from the pencils and stick the animal pom poms in there, by applying pressure with circular moves
4. For decoration cover the pencils with washi tape or create your own washi tape using the printed images
Idea number 2: Panda lunch box
Supplies:
-A lunch box
-White and Black felt
-A glue gun
-Some fabric of your choice
-2 liter plastic bottle
-sticky tape
-scissors
-double sided tape
Steps:
For the panda figure:
1.Draw a rough panda sketch on a piece of paper to figure out what you will need
2.Based on my sketch I cut out 2 semi-circle shaped ears, 2 black egg shaped eye circles, 2 white circles, an oval shaped nose, and an upside down "Y" shaped black mouth.
3.I glued the ears on the top and the ears,nose and mouth on the front using the glue gun.
For the handle:
1. Cover the plastic bottle with one row of sticky tape and cut around it.
2.Leave a semicircle shape and bend the edges.
3.Create a fabric tape like here, and cover the handle in it.
4.Stick the handle on top with your glue gun and you're done
Idea number 3 : Apple pencil holder
Supplies:
-a round jar
-red acrylic paint
-white string
-some leaves from some fake flowers
-glue
Steps:
1.Paint the jar inside with red.
2. Add glue on the top edge
3.Wrap around some string, along with the leaves
4.Leave everything to dry and you are done!
Idea number 4 : Puzzle Notebook
Supplies:
-a notebook
-a printed table, you can download this table for free here
(You can also create your own table if you don't have a printer. Just mark the middle of the edges of a white sheet of paper . Then mark from that point ,towards right and left half a inch in steps until you get to the corners. Join points from opposite sides .)
-you will also need some double sided tape.
Steps:
1.Stick on the edges of the notebook and in the center stripes of tape.
2.Reveal the sticky sides and place on top the printed table.
3.Complete the boxes with letters and form words of your chose like "science is cool" .
4.Color those words with crayons or markers so you won't lose them
5.Complete the rest of the boxes with letters ,randomly or hide some secret words
6.You can also decorate the edges of the table with washi tape if you like
Idea number 5 : Vintage Camera Sharpener / Crayon Box
Supplies:
-a big match box
-a sharpener
-very strong glue
-2 bottle caps
-acrylic paint (black and silver)
-marker
-x-acto knife
Steps:
1.Glue the sharpener to an inside corner of the matchbox
2.Using the x-acto knife, create two holes on the outside corner , to match the holes of the sharpener.
3.Applying pressure with circular moves, enlarge the holes with a crayon, until you are apple to sharpen it.
4.Draw two lines parallel with the longer edges
5. Glue the bigger cap on the front of the box and the smaller one on the top.
6.Paint the middle with black and the margins with silver
7.Add details to make it look more realistic : like painting the edge of the bigger cap with silver and tapping a little paint in the middle with your finger. You can also draw some rectangles in the left top corner with a black marker
And you're done
Add in there some crayons and you're ready to draw some photos :)
If some of the steps above are not clear enough watch video bellow to understand better all the details:
I saw once on Etsy.com these cute animal planters made of felt, and I thought I should make my own. Since I don't know how to work with felt, I made them from air drying clay, and chose to go with an owl representation, because it is easy to recreate. I incorporated all the process in a video, so you can make your own planter as well. See video at the bottom of this page.
Let's begin! But first here is something for you to pin :
Supplies:
When you buy little plants, they come in these plastic containers, so look for a jar or cup that is a little bigger than the container.
You will also need some air drying clay.Here is a suggestion :
-A knife
-Some tin foil
-A non sticky surface, to work your clay on it
-Something to roll the clay with- I used a bottle spray
-And a cup of water ( to help you smooth the surface of the clay )
Steps:
1.Cover the bottom of the jar with tin foil and press it until it's smooth
2.Take a ball of clay and roll it until you obtain a round piece of about 0.5 cm thickness.
3.Place the round piece of clay on top of the jar and press it until it gains the shape of the jar.
4. Roll an other piece of clay until you obtain a cylinder shape, then press it and roll it until you obtain a rectangular shape, long enough to embrace the jar
5.Wrap around that piece around the jar, and using your fingers dipped in water, combine the 2 parts of clay together until you obtain a cup shape that sits on top of the jar.
6.Turn over the jar, and using a stick or a pen , roll out the edge, and smooth it with your hands.
7. For the owl look, place 2 flat circles of clay on front , and smooth the center of them with your finger., creating the eyes.
8.Create also a conical shape and place it between the eyes , creating this way the beak.
9.Using a stick ,make some long marks on the back , resembling some feathers.
10.Remove the jar from the clay form. It will easily come out, but the tin foil will be stuck on the clay.
11. Leave it to dry for about 24 h or over night. After it's dried the tin foil pops out easily.
12.You can place your plant in there, or optional you can paint the owl, on the eyes and beak to look more funny.
Every time I see new photos from NASA I feel so tiny , and so amazed by the beauty of the Universe.It's silent, mysterious and so abstract with all the merging colors on a deep black background. It is truly a great source of inspiration and a very cool theme to use on your products or clothing.
There is a trend circulating lately , with Galaxy DIYs, where it shows you how to obtain those abstract patterns and colors of galaxies, so I thought I would show you a more complex design with a piece of the Universe, that includes planets, stars and galaxies.
So to make this very useful for you , I thought of a T-shirt with Universe design, because clothing with designs like that can be very very expensive.
Let's get started! But before we begin here is something to pin :
You will need:
1.A black cotton T-shirt. Don't invest too much on this one. buy something simple and comfortable, so in case your design doesn't work out, you can wear the shirt as a PJ
2.Fabric Paint- I bought the cheapest ones - that include only basic colors- and that's ok because I'm going to show you how to mix them to obtain diversity.Here is a suggestion:
3.A sponge- again- nothing fancy- I'm using a dish washer sponge
You will also need a paint brush and some water.
I'm not going into details with the whole process of painting because it's very well illustrated in the video down bellow. But here are some tips and tricks :
1. Since the T-shirt is black , don't paint colorful planets directly because they will not stand out. First paint some white circles and use color on top of that.
2.Choose one of the circles to be a source of light -like a sun or a star-and paint the circle with a very light light yellow/orange. After that don't draw lines around it like in preschool.Use the sponge and tap around it. Use one layer of the same light color, one layer of white and again a layer of light color- but one on top of the other and not one next to each other.
3.If you have your source of light, imagine that it spreads light on the surrounding planets as well- so the light will touch the other planets perpendicular.
4. To illustrate that , paint the planets in blending shades of color.
For example if you want a green planet :
-First mix green with yellow or white and paint the top edge where the light from the sun "touches" the planet
-Go further and paint bellow that an other layer of simple green
-Mix green with blue and paint an other layer bellow the the anterior one.
-Paint the opposite side of the lighted area (like the dark side of the planet) with a mix of black and green
-Try to blend a little these layers where they touch each other
This advice is for 4 layered color planet but you can stick to basic of 3 layers :
-white + color
-color
-black + color
And that's about it. I hope you find this useful. Here is the video I promised :
A lip balm or a lipstick is something that every woman should have in her purse. It happens many times to have pale or cracked lips, because of weather or dehydration and it's important to take care of them and use all natural ingredients. That part is very important , and not only because chemicals can worsen the aspect of our lips , but also because we inevitably swallow lipstick components and that may cause some stomach problems.
Nowadays it's easy to find organic and BIO lipstick and lip balms but I personally find them very expensive. Also, the recipe for making one is very easy, and as for containers, you can recycle old ones.
Working on a lot of craft projects has made me realize that the glue sticks we use for paper crafts have the same principle as lipsticks, so why not recycle them?
Here is my recipe + instructions for the glue sticks.
I made 3 lip balms with 3 different flavors. Please watch the video at the end of this article to see my impressions for the final product.
Ingredients (for 3 lip balms):
-2 tablespoons of jojoba oil
-2 tablespoons of coconut oil
2-tablespoons of beeswax
Where to find them:
You can use any type of oil, as long as it's organic, with lots of vitamins, and with no strong odor or taste. Just remember that the oil : beeswax ratio is 2:1
For color and flavoring I used :
-honey
-cocoa
-pink or red jam - I used homemade rose jam
-mint essential oil
-lemon
For containers I recycled some glue sticks. You can also find containers to buy, but usually they come in a large pack. Here are some suggestions:
For decorating the containers I used
-Nail polish
-A container full of water that you don't mind throwing away after
This part is optional. You can leave them white and simple or you can decorate them with washi tape.
Instructions:
-Remove all the glue from the glue sticks, then leave them to soak in hot water for about 10 minutes
-Wash them with hot water and dish soap until all the glue is dissolved and all the wrapping is gone
-Let them to dry
-Pour in the container full of water that you don't mind throwing away stripes of nail polish of different colors
-Put on the lid of glue stick container and dip it in the nail polish mixture. The nail polish will stick on the glue stick and you will create a marble effect. Leave them to dry at least 30 minutes.
If you want to skip this step you can do so, and decorate the containers with washi tape.
-Next prepare the 3 flavors.
You can use 3 plastic cups to mix the ingredients in them :
In the first cup add half teaspoon of cocoa and 5 drops of mint essential oil
In the second cup add 1 teaspoon of jam
In the third cup add half teaspoon of honey and half teaspoon of grated lemon peel .
- Next it's time to melt and mix all the ingredients.
If you are using a stove, add in a little pot the oils and beeswax and then put the pot above a bigger pot filled with water. Don't put the mixture direct on the flame. Just wait for the water to boil, and the heat from the water will melt slowly the oil or the beeswax.
If you are using a microwave, put the oils and beeswax in a bowl safe for microwave and let them for about 1 minute. If still not melted after 1 minute , leave them for more time.
-After everything is melted and mixed pour the mixture evenly in the 3 plastic cups and stir.
-Pour the 3 mixtures in the 3 glue stick containers and let them cool for about 15 minutes
You will have to act fast at this step because the mixture doesn't stay liquid for long time.
Please watch video bellow to understand better the steps:
Planning a wedding can get complicated and stressful. After all , you may have dreamed about it since a little kid and maybe you feel a little frustrated that it has to be PERFECT. Knowing this I've been planning to make a DIY specially for the future weeds, maybe to inspire them or help them with ideas for the event. For now I came up with some wedding favor ideas. If you think I can help with other things let me now in the comments. But before anything else what are wedding favors ? Here's a hand from Wikipedia : Wedding favors are small gifts given as a gesture of appreciation or gratitude to guests from the bride and groom during a wedding ceremony or a wedding reception. The tradition of distributing wedding favors is a very old one. (Source) Personally I find this tradition really cute and I would love to receive one so I can have a little "souvenir" from the people that celebrates love. Also it's important to make your guests feel special and that you are happy they came to be with you in your special day.
Now before we begin here is something to pin :
Wedding Favor No. 1 : Mini Flower Pot
Supplies: 1.Mini terracotta pot 2.A piece of kraft cardboard ( I recycled a cute gift bag) 3.A pattern scissors 4.White acrylic paint 5.Some sand beads ( I used white and glossy but you can go with pink or beige etc ) 6.Transparent glue 7.Tissue paper 8.Mini paper flowers 9.A piece of organza 10. Pen and brown crayon 11.A mini shape cutter
Steps: -Cover the mini terracotta pot with 1-2 layers of white paint and let it dry -Write on the piece of cardboard a cute message or something simple like " Thank You!" -Use the mini shape cutter to cut out a little piece creating a shaped hole -Take the organza and push is through the hole then tie together the message with a little paper flower - Fill the terracotta pot with 2-3 layers of tissue paper with glue between them -Pinch in the middle a hole using something thin and sharp like a toothpick -Squeeze the flower in there and add on top plenty of glue -Then place a layer of sand beads -Dip the crayon in some water -Write your initials on the painted pot- this is optional- you can leave it simple if you want Wedding Favor No 2 : Message in a Bottle
Supplies 1.A tiny glass bottle 2. Kitchen salt ( I used himalayan salt ) 3. A piece of white string 4.Pattern scissors 5.Transparent glue 6. Sea related objects ( seashell, pearl , glass)
Steps: - Draw a heart shape with glue on the glass bottle -Dip the shape in salt creating a salt heart -Write a personal message on a piece of paper .Something like : "You're a life saver, thanks for being here!" -Cut around the message with the pattern scissors then roll the paper creating a mini scroll. -Tie the mini scroll with the white string -Now go ahead and fill the bottle -first salt, then the message, then the sea objects - I used a shell, a piece of glass and a white pearl
Wedding Favor No 3 : Message in a Box
Supplies: 1.A box of matches 2.Washi Tape 3.Pattern Scissors 4.A glass bead/stone ( I found this at the home decor section) 5. Metallic Golden acrylic paint 6.Paper and pen 7. A piece of cotton 8.Glue
Steps:
-Paint the back of the glass stone with golden metallic paint and let it dry -Roll washi tape all over the cover of the matchbox -Add some glue to the interior of the box and push in the piece of cotton -Write a personal message on a piece of paper. Something like : " Your presence here is gold!", then cut around it, roll it into a scroll and tie it with a piece of string. -Put the scroll on top of the cotton along with the gold drop glass and close the box
Wedding Favor No 4 : Just Married Car
Supplies : 1. A toy car 2.A piece of cardboard 3.A piece of organza and a big fork ( this is for creating little bows -if you bought them skip this step) 4.Transparent glue 5.Toothpick 6.Pattern scissors
Steps: -For creating the little bow -go around the edges of the fork twice then tie a knot in the middle. See video bellow for better understanding -Glue the bow on the front hood of the car. -Write a message like "Just Married" on the cardboard and cut around it with the pattern scissors -Glue the toothpick on the back of the message then glue it all together on the car. If you want you can glue only the message if it's small enough. Wedding Favor No 5 : Mini Wedding Cake
Supplies: 1.Three bottle caps of different sizes -one bigger than the other 2.Glue gun 3.White acrylic paint 4.Cardboard+ pattern scissors 5.Some white paper flowers
TIP : if you are making more of these use white spray paint for a faster result. ask your friends and family to save bottle caps for you so you can have enough of them Steps: -Using the glue gun stick the smaller cap on top of the bigger one creating a wedding cake shape -Create a whipped cream pattern on top and on the edges of the caps using the glue gun -Cover it in 2-3 coats of white paint and let it dry -Write a personal message on a big piece of cardboard .Something like : "So sweet of you to come! " -Cut around it with the pattern scissors then glue the mini cake on the cardboard right next to the message. -Glue some paper flowers on the edges and on top of the cake And that's it! Let me know in the comments which one is your favorite; If some of these steps are not clear enough please watch the video bellow. It shows how to create all 5 of the wedding favors:
Don't you just love feather jewellery? They are so delicate and warm, and make a great accessory for summer. Ok.....so maybe you decided to buy some.......but what if it's too expensive for you..or if the designs you see in stores don't match your personality? Here is where I come in to give you a hand.
I will try to explain as good as I can all the steps here, and if you're not convinced check out the video at the end of this page to understand better the process.
First of all, materials :
1.Feathers-I used pigeon feathers-but you can use any feathers you like. Here are some suggestions:
2.Some Bead Caps of your choice. Here are some suggestions:
3.Some Pins with loops. Something like this:
4.Earrings hooks. I always use hypoallergenic hooks from stainless steel like these ones:
5.Some strong glue like this one-I personally prefer UHU glue because it doesn't smell bad and when dried it's pretty strong:
6. Two types of pliers. One for cutting and one for creating the loops
7. Optional! Acrylic paint and some decorative stones. Some suggestions:
Let's Begin! But first- something for you to pin
Step 1. Push the earring pin through the bead cap, pull it up as much as you can and then bend it at 90 degrees. Cut the pin, leaving about 1 cm. Then take the looping pliers, grab the end of the bended pin and start rolling inwards creating a loop.
Repeat this step one more time- if you are creating one pair of earrings.
Step 2. Take the feathers and cut off the pointed end. Pour glue into the bead cap and then squeeze the feather in there. Let it dry.
Step 3. Detach the loop of the earring hook and join it with the loop of the cap.Close it back when you're done.
At this point you should have some simple, natural looking feather earrings.
I continued to personalize them a little like this:
Step 4. For the first design I used 3 diferent colors : Dark blue, violet and bright green. Just apply the paint with a brush, and spread the lines of the feather.
For the second design I used golden metallic acrylic paint and for the third I used silver color.
Step 5. After dried, I applied some dots of glue along the spine of the feather, then placed on them some decorative shinny stones.
And that's it, you are done! :)
Here is the video I promised ( I assure you it will be more clear after seeing this one ):
Since I started creating jewellery a few years ago, I had the opportunity to participate at various handmade fairs, and the one thing I learned from them is that the way you present your product can be more important than the product itself.
The same applies to your room and personal space, and even if you don't think constantly about it, you should invest more time in it. Your room is the place you sleep and maybe study or relax , so a beautiful and tidy environment will help keep you happy and positive.
This DIY consists of 3 items : a cactus earring holder, a watermelon plate (jewellery holder ) and a decorative jar that can also have a specific purpose : a vase , a candle holder or simply a place to keep your makeup brushes.
Also I tried to do this as cheap as possible, with dollar store products or things you can recycle.
So let's begin! But first feel free to pin :
For the cactus earring holder you will need :
1.A cardboard sturdy box (you can use a cereal box)
2.Acrylic paint and brushes
3.Some golden glitter -I found this at the dollar store next to the nail polish
4.A glue gun and some simple liquid glue
Steps:
Draw a desert type cactus shape on a piece of paper and cut it out . Then cut 2 big pieces of cardboard from the box and trace the shape of the cactus on to them. Cut out the cactus shapes of cardboard.
One of the pieces will be your base. As for the second-cut out from it the body and the arms of the cactus. Then cut all of them in half.
Next you will use the glue gun to stick all of the halfs on the cactus base shape right in the middle of the body and in the middle of the arms.
For this to stand you will need a support -so cut out a cardboard circle and stick the cactus on to it.
If these steps seem a little confusing please watch the video from the end of the article.
After all it's glued go ahead and paint it. I used a minty color for the cactus and a sand color for the support.
Once it's completely dried add some glue on the edges and sprinkle some glitter on to it.You can also add glitter to the support. After that shake it good and leave it to dry.
For the watermelon jewellery support you will need:
1.Transparent plate and cup- I bought this from the dollar store at a very cheap price- under 1 dollar each
2. Acrylic paints and brusshes
3.Glue gun
Steps:
Place the plate with the back facing you. Start painting the edge of the plate with green ( I used a minty color) -to represent the peal of the watermelon.
Then start painting the seeds with black in the center of the plate. After that's done start adding pink paint to represent the fruity part.
After completely dried go ahead and stick the cup to the back of the plate and you will have a beautiful watermelon jewelery holder.
For the pastel layered jar you will need: 1.A simple jar - I used one from a jar of pickles I bought one day (recycling ! yay!)
2. Acrylic paint and brushes
3.Liquid Glue
4.White String
Steps:
Start painting the jar from the inside in layers. I was inspired by a sunset at the beach so first I added light blue, then minty color, then sand color and at the end some pink. I blended them carefully without mixing them together.
At the end I added some glue to the top edge of the jar and rolled some white string over it. This is optional. You can leave like that, add paint or even glitter.